Pages

Frozen Tropical Salad


When it is sweltering outside what could be better than to have a nice frozen fruity salad in your freezer.  How about bananas, pineapple, pecans, maraschino cherries and sugar held together with some sour cream or Greek yogurt. 

I sometimes add 1/3 to 1/2 c. toasted coconut to this and use chopped macadamia nuts instead of the pecans.  The original recipe called for sour cream, and I used low fat.  Now, however,  I usually use Greek yogurt.  I also sometimes use Splenda instead of sugar if the diabetics in the family will be eating this.  The maraschino cherries are included mostly for color.  If there are objections to eating them, use 1/4 c. halved raspberries.

Most of the time I spoon this into paper-lined muffing tins.  After they are frozen, I remove the salads and put them in a freezer bag for further storage.  I have used the silicone muffing liners with success also.

Now I must confess, this not a salad. It is a dessert masquerading as a salad. But who am I to hurt its feelings. So I just plop it on a lettuce leaf, and let it call itself a salad.

Frozen Tropical Salad

3 medium bananas
2 c. sour cream or Greek yogurt
1 can (20 oz.) can crushed pineapple, undrained.
1/2 c. chopped pecans or walnuts
2 T. maraschino cherries
1/2 to 3/4 c. sugar, according to your taste

Peel bananas and place in a medium sized bowl.  Mash the bananas well.  Add remaining ingredients and blend well.  Turn into an oiled 6-cup mold and freeze several hours or overnight.  Unmold salad onto a platter lined with lettuce leaves and let stand 15 minutes before serving.   Serves 10-12.  Or spoon into paper-lined muffin tins and freeze several hours or overnight.  Remove paper liners before serving.  Makes about 18 salad cups.

Linking to:
It's a Keeper Thursday
Full Plate Thursday
Recipe Swap Thursday
reade more... Résuméabuiyad

Princess Cupcakes


I admit, I have fallen victim to the cupcake rage that's sweeping America.

I have purchased cupcakes from Caboodle Cupcakes (our local cupcake store here in Terre Haute).  They were so very TASTY!  I drool like Pavlov's dog every time I drive by their store.  I have day dreams about their Carrot Cake with Cream Cheese frosting.  I yearn to have endless hours to enjoy their cute little store.
I LOVE cupcakes.  I admit I can't get enough of Food Network's Cupcake Wars.  I have purchased so many Cupcake Cookbooks including What's New, Cupcake? and even a "few" of those magazines you can buy at the checkout line at the grocery store that are entirely focused on Cupcakes.  I am embarrassed to show you my cupcake book library.  But it makes me happy.
So every party that I throw has to have cute cupcakes.  I admit, I don't always succeed. (You remember the Bowling Pin cupcakes I made right? I keep trying to erase that memory.)  But I try.  It's so fun to make cupcakes to go along with the party theme.

So when I was thinking of my Princess Baby Shower, I had to do something as sweet and cute as our new little princess herself.
I started by buying the Princess Chocolate Candy Picks Mold.

I painted out the mold's indentations to be pink for our little princess and then cast the crowns in white chocolate.

When they were ready I pushed them into my 2 cupcake styles.

To dress the cupcakes up a little more, I added our Princess Crown Cupcake Wrappers.

Now, if only it were Carrot Cake it would be perfect!


reade more... Résuméabuiyad

Ingredient Spotlight-Frozen Peaches and Cream Crisp-GF

 
Since I am the self-proclaimed queen of layered desserts, when peaches were the Spotlight Ingredient a few weeks ago, I began thinking about creating a new one.  Unfortunately local fruits are very behind here this year, and California peaches were just beginning to hit the super markets.  I decided to wait, so posted the Peachy Keen Barbecue Sauce at that time.

I continued to think about something with peaches, and when I found the Easy No-Machine Ice Cream recipe, I knew I had a base to work with.  I then decided to use an Oatmeal Crust from an old cook booklet called The Quaker Oats Wholegrain Cookbook put out in 1979.  I wanted the flavor of peaches and cream (my favorite way to eat peaches), so I added a cream cheese/powdered sugar/frozen whipped topping layer and now present Frozen Peaches and Cream Crisp.

The oat base has no flour in it so this dessert can be eaten by my gluten-free friends if gluten-free oats are used.   An additional 1/2 c. of oats, wheat germ, or unprocessed bran can be used instead of the nuts for those who do not like nuts or have allergies.  I would try whipped cream (1/2 c. unwhipped) or Greek yogurt for the frozen whipped topping in the cream layer if I did not want to use the topping.  If a thicker “cream” layer is wanted, double the ingredients.

I have Gladware baking pans with lids that I use to make this, but I don't know if they are still available.  If a pan is used that may be needed before the dessert is eaten up, line the pan with a piece of heavy duty foil, letting the foil extend beyond the short ends.  When the dessert is completely frozen, lift it from the pan using the foil as handles.  Wrap foil around dessert then wrap tightly with plastic wrap.

I prefer to add 1 to 2 chopped peaches to the ice cream layer.  My hubby, however, bought cling peaches which were so difficult to remove from the pit, I did not add any to the dessert in the photo.  Any other pureed fresh fruit or berries can be used in place of the peaches.  Do not puree the fruit too smoothly.  I use fresh fruit as much as I can, but well-drained frozen or canned fruit can be used in the winter.  Though not necessary, I added a couple drops each of red and yellow food coloring to get the peach color.

This is definitely a “make ahead” dessert and makes 15 servings so is great for a party.  Of course, it keeps well in the freezer so there doesn’t need to be 15 people to eat it at one time.  At our house, I make this up, and we eat it over a couple of weeks.

Frozen Peaches and Cream Crisp

2 c. quick rolled oats
1/2 c. finely chopped nuts (I used walnuts)
1/2 c. firmly packed brown sugar
1/2 c. (1 stick) butter, melted
1 pkg. (8 oz.) cream cheese softened (can be 1/3 less fat, but I’m not sure why one would bother considering the other ingredients)
1 c. powdered sugar, sifted
1 c. frozen whipped topping,thawed
1 can (14 oz.) sweetened condensed milk (or make your own)
1 c. pureed peaches (about 4 small peaches)
2 c. (1 pt.) whipping cream, whipped till soft peaks form
1-2 additional peaches, peeled and chopped
1-2 drops each red and yellow food coloring

Combine oats, nuts, brown sugar, and melted butter mixing well.  Measure out 1 c. and spread evenly in an 8-in. square pan.  Do not press down.  Put remaining mixture into a 9x13-in. baking pan (preferably one with a cover) and press down evenly to form a crust.  Bake both pans at 375 degrees 8-12 minutes until golden brown.  Remove from oven.  Set crust pan aside to cool 30-45 minutes.  When cool enough to touch, crumble mixture in 8-in. pan with your fingers and set aside.
In a medium bowl combine softened cream cheese and powdered sugar stirring until well blended.  Fold in whipped topping until well blended.  Spread mixture over cooled oat crust.  Place in freezer for 30 minutes.
Peel, chop and puree peaches, using a blender or food processor.  In a large bowl mix peach puree and sweetened condensed milk until very well blended.  Gently fold in the whipped whipping cream until very well combined.  Fold in chopped peaches.  Add the red and yellow food coloring and mix well, adding additional coloring until the desired shade is reached.  Pour this mixture over cream cheese mixture in pan.  Sprinkle the reserved oat mixture over the top.  Cover tightly with a piece of plastic wrap.  Place in freezer and freeze at least 6 hours.  To serve, remove from freezer, cut into squares with a moistened kitchen knife and place on dessert plates.  Makes 15 servings.  For extended storage cover dessert tightly.

Linking to
Made From Scratch Tuesday
Ingredient Spotlight
Cast Party Wednesday
These Chicks Cooked
Foodie Wednesday
Recipes I Can't Wait to Try
Sweets for a Saturday
Strut Your Stuff
reade more... Résuméabuiyad

Pinning the Crown on the Princess

I LOVE Pinterest.
I know, I know...everyone seems to be saying that lately, but it really is the most genius system.  A visual way to keep your bookmarks where you can easily view them and find their original source...GENIUS!

So for every party that I work on, I create a board and start pinning.
I admit, my Princess party isn't very big...I've just been too busy creating to pin, but I wanted to share with you some amazing Princess Crowns that I've come across.

After all, you can't have a Princess Party without a crown for each and every Princess!

We Talk of Christ shared these Princess Party Crowns made from cardboard and fabric.

Lu Bird Baby shared these Princess Tiaras made from a headband and some felt.

Family.com shared this Tiara Printable made from card stock.


Hungry Happenings shared this Princess Pastry Crown made from pastry and bananas!

If you want to see my whole Princess party board, you can see it HERE.  There are so many amazing party ideas out there that I can't wait to fill out my board and create the perfect party.


reade more... Résuméabuiyad

Cooking with the Journal-Marinated Tomatoes


Continuing with the salad theme from yesterday, today's recipe is for Marinated Tomatoes.  This is an easy, do-ahead thing to do with tomatoes when that is all the salad ingredients one has on hand, and one is tired of plain, sliced tomatoes.  It also helps those bland tasting tomatoes we get when tomatoes are out of season.

The original recipe called for the tomatoes to be peeled.  I usually don’t bother.  I just put this together, put it in the refrigerator and chill several hours or even overnight.  Any herbs desired can be used instead of the oregano.  Basil is very good.  Fresh herbs can be used,  increasing the quantity to 1 t.  To peel tomatoes easily, dip them briefly in boiling water.   A little fresh or dried parsley added to the mix adds nice color.  I use Spice Island Sea Salt and Pepper Grinder for the salt and pepper in this recipe and just grind until it looks right.  These can be adjusted at serving time if necessary.;

Marinated Tomatoes

Farm Journal’s Country Cookbook
Farm Journal Books, 1959, 1972

5 large ripe tomatoes
1/4 c. olive oil (the original recipe called for salad oil)
1 1/2 t. lemon juice (fresh is best)  May also use red wine vinegar
1/2 clove garlic, minced
1/2 t. salt
1/2 t. oregano
1/8 t. pepper (freshly ground is best)

Peel tomatoes and cut into thick slices.  Combine remaining ingredients.  Pour over tomatoes.  Chill thoroughly, stirring once or twice.  Makes 6 servings.
reade more... Résuméabuiyad

DIY Groceries-Salad Dressings 2

Good Monday morning.  Welcome to my new followers and thanks again to all for following my blog.  I hope that you find the information here useful. 


Don’t hold the mayo.  The homemade dressings that I am sharing today either start with a base of mayonnaise or have mayonnaise as an ingredient in them.  There are both familiar and unusual flavors in these dressings.  There is a simple Thousand Island Dressing, a Honey Mustard Dressing, a Sesame-Soy Dressing, a Ripe Olive Dressing, and an Applesauce Dressing.  All are quick and easy to make, but most require some chilling time.  All recipes can be doubled or halved as needed.  Half amounts of most of the recipes will fill a 6 oz. jelly jar.  A group of salad dressing in the jelly jars are a very nice Christmas gift for local people to whom gifts can be delivered.  These dressing also make very good sandwich spreads.


Many Thousand Island Dressing recipes include a chopped, hard-cooked egg.  This one does not and will keep longer than one with egg in it.

Thousand Islands Dressing

1 c. mayonnaise
1/2 c. chili sauce
1/4 c. ketchup
1 T. pickle relish

Combine ingredients together in a small bowl, blend well with a wire whisk.  Transfer to a covered container and chill at least several hours.  Makes 1 3/4 c.


This Honey-Mustard recipe actually came with a Chicken Finger recipe that I use, but we like it as a salad dressing also.

Honey Mustard Sauce

1/2 c. honey (grease the measuring cup and the honey will slide right out)
1/2 c. mayonnaise
1/2 c. Dijon style mustard
1 t. Worcestershire Sauce

Mix together honey, mustard, mayonnaise and Worcestershire sauce in a small bowl using a wire whisk.  Transfer to a covered container and  chill at least several hours (1 day is better) before using.  Makes about 3/4 c.


It was not included in the original recipe, but I like to add just a pinch of Chinese 5-Spice to this Sesame-Soy Dressing.  Be sure that you keep the sesame oil in the refrigerator.  It can become rancid rather quickly if left at room temperature.  This is a great dressing for chicken salad, and I like it on fruit.

Sesame-Soy Dressing

1 c. mayonnaise
1/2 c. plus 2 T. rice or white wine vinegar
1/4 c. sugar
1/4 c. sesame oil
2 T. soy sauce (I use low sodium)
1/2 t. garlic powder

Combine all ingredients in a medium bowl and mix well with a wire whisk until sugar is dissolved.  Chill several hours before using.  Makes about 3 c.


I like ripe olives, but hubby does not so I usually halve the next dressing.  I often buy small cans of sliced ripe olives, drain the can, chop the olives in a mini food processor and just use that amount of olives.

Ripe Olive Salad Dressing

1 c. mayonnaise
1/3 c. chili sauce or ketchup
1/2 c. pitted ripe olives chopped
1/4 t. garlic powder
1/4 t. celery salt
1/4 t. dried basil leaves, crushed
1/4 t. Worcestershire sauce
1 hard-cooked egg, chopped (I usually leave this out as the dressing keeps longer without it)

Combine all ingredients in a medium mixing bowl and beat with a wire whisk until well blended.  Transfer to a covered container and chill several hours before serving.  This is nice served on lettuce wedges.  Makes 1 3/4 c.


This dressing doesn’t have a lot of mayonnaise in it, but I am including it because it is an unusual and tasty dressing.

Applesauce Salad Dressing
1 cup unsweetened applesauce
1/4 cup sour cream
2 T. mayonnaise
1 T. lemon juice
1/2 t. prepared mustard
1/4 t. salt
1/4 t. garlic, minced
1/8 t. white pepper

In a small bowl, stir all ingredients until thoroughly blended using a wire whisk.  Transfer to a covered container and refrigerate at least 2 hours for flavors to blend. May be refrigerated up to 1 week.   Makes about 1 1/2 c.

Linking to Melt in Your Mouth Monday
Newbie Party
Sharing Monday
Recipe Sharing Monday
reade more... Résuméabuiyad

A Royal Giveaway

Sometimes when I'm searching through Etsy to share with you great favors and decorations for your next party, a shop just catches my attention and makes me sit down and stay for a while.  That happened while searching for ideas for my Princess Baby Shower party.

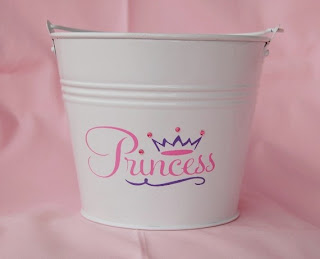
If you'll remember, I shared this Princess Bucket by Lilybella in my Princess Party Gift Guide treasury..

Isn't it just the perfect addition to your party?
It's big enough to be able to use on your dessert table so it will add to the colors and feel of your theme.  You could put decorated water bottles in it.  You could fill with cookies or treats.  Or what about putting your party favors inside it?  Or even letting guests put their cards or gifts into it?

After the party is over, you can let the Mom-to-be take it home as a wonderful gift for the nursery!  This bucket would be wonderful to add the little knick knacks in a nursery.  Can't you just see all the little princess's hair bows and ties in it?  Or what about putting burp cloths in it?  Or those sweet little baby socks?  Or even the great smelling bath items in it?  Then the mom can just grab and go every time it's bath time.  (Wonderful for one less thing to look for or worry about as a new mom!)

And when the sweet little Princess gets older, this bucket can hold toys and games in it! Or crayons! Or any of the little treasures kids like to collect.  It can grow with her through the years, especially since it can be personalized with her own name, making this a treasure bucket that will last forever.

What a perfect bucket!

In fact, there are ALOT of perfect items in Lilybella's Boutique.

Are you having a Minnie Mouse party?  She has a Personalized Minnie Mouse bucket that would be perfect as a gift or addition to your party.  Don't you just love the Polka dots within the polka dots?  I love those red dots with white polka dots.  So festive and perfect for a Minnie party!

I know Trains are a BIG hit right now in boys parties, and Lilybella didn't leave the little boys' out of her great shop.  Check out this Choo Choo Train bucket!  Personalize it in your party colors, so if you're having a Thomas the Train party or a locomotive party you can customize it with the conductor's name and party colors.

Can you tell I ABSOLUTELY LOVE these buckets?  In fact, I have a secret addiction to buckets and bags.  I can't tell you how many tote bags I have and much to my hubby's chagrin, I am always looking for more.  So imagine my delight when I saw these Oilcloth Totes in Lilybella's shop.

I've never heard of Oilcloth fabric before, so imagine my delight that this fabric is waterproof, stain proof, and almost indestructible!  And it comes in some great fabrics.  I was trying to figure out which fabric I like best and I can't decide between the Cherry Pie tote bag...

Or this tote with the Black Paradise Lace!
I can just see how great a tote this would be for my "Church bag" or for carrying my craft items around.  Football season is starting and I end up waiting at practices ALOT, so I carry my plastic canvas and cutting supplies to work on projects while I wait.  It's a great idea to always have a project in the bag that I can grab and go.

I know Mini Me would LOVE to have one of these Chalk Art Mats for all the time in the car and waiting at practices too!  He's such a little artist and a "crafter" that he'd spend hours with this mat.  It's the perfect size for grabbing and going, especially since it's made with the great Oilcloth material that will keep it stain proof and safe!

Can you tell I just LOVE Lilybella's store?  There are so many great products for your parties, home, and those mom moments when we need to gather things or entertain our kids!

And check this out...Lilybella also has a Lilybella ONLINE store with more amazing products.  OH NO! Guess I know where I'll be spending my afternoon.  There are lots of great products there and even a spot to buy Party Packs where you can get your party favors at a discounted price for purchasing several at a time!  So fun and so clever!

And to make it even better, Lilybella has generously offered to GIVEAWAY one of her AMAZING Princess Buckets to one lucky reader of our blog.  Can life get any better?

To enter:

Visit Lilybella's Etsy Shop and come back to tell me your favorite item in her store!

For extra entries:
'Heart' Lilybella's etsy shop and come back and let me know you did.
Visit Lilybella's online store and register as a new customer to receive her newsletter and then let me know you did.
Become a fan of Lilybella on facebook and let me know you did.
Become a fan of Kims Kandy Kreations on facebook and let me know you did.

GIVEAWAY NOW CLOSED!
 CONGRATULATIONS TO THE WINNER!
reade more... Résuméabuiyad