Pages

Puffy Paint Window Cling DIY

A fun and easy DIYactivity for children of all ages.  Make puffy paint window clings for your holiday windows using common ingredients found in your craft closet.


As my children get older, I have found that I want to give them less "things" at Christmas and more "experiences."  They have enough toys and junk around the house, but I worry with all our busy lives that they need more memories to look back on and enjoy.  It doesn't even have to be the big memories like trips to Six Flags or family vacations that they need, but memories of eggnog while watching the Thanksgiving parade, picnics during family night at the park, or sitting around the Dinning room table playing cards or creating Christmas crafts.


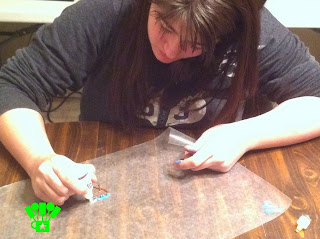
making puffy paint window clings

Aren't these the gifts of Christmas?  Or at least what they should be?  I feel like we get so busy in our lives that we forget to spend time together.  As Drama Queen nears graduation and moving out into the world, I feel panic setting in.  Are they going to look back on their childhood and remember that their family loves them?  Are they going to remember the little moments that we played and lauged together?

I hope so.  We added one more moment this week when we made our own window clings for our holiday windows.

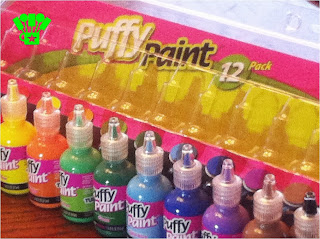
puffy paint 12 pack of colors
I found this 12 pack of puffy paint at Walmart, but you can find Amazon's puffy paint here.  I liked having the variety so the kids could make anything their imaginations created.  I also grabbed a few sheets of xx paper from the kitchen cabinet and called the family together.

Making Window Clings out of Puffy Pain
We sat down and started drawing with the paint onto the paper.  Mini Me had a little trouble keeping the paint an even line without pushing too hard or too soft on the paint tube.  You might need to watch your little ones with the paint if you try.

Nativity Scene Window Cling DIY
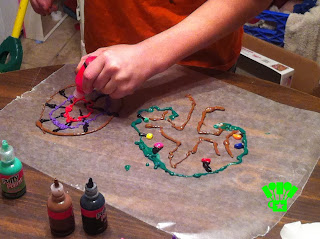
Drama Queen made an entire nativity set with her designs.  To make these successful, you need to make sure the lines all touch or the graphics are colored completely in.  Her angel's halo will be a separate piece to the set.  So keep that in mind as you're drawing.

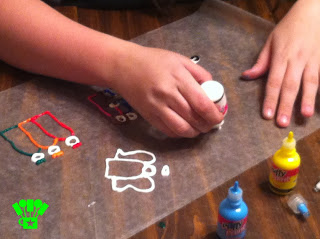
DIY Christmas Window Clings
We talked and drew for about an hour or so before being done with our designs.  We had everything from a mustache to a spider web to a Christmas ornament to the words Merry Christmas before we were done.  Then the paint needs to sit for about 24 hours to completely dry.  Once dry, you can peel them off the wax paper and use your hand to warm them so they will stick to your window.

We had a great time talking and laughing and drawing.  We will definitely do this again for other holidays and activities.  Hopefully the memories will last as long in their minds as they do in mine.  

What do you like to do with your family?

reade more... Résuméabuiyad

Cranberry Crunch Cake-Secret Recipe Club

Secret Recipe Club

My last Secret Recipe Club assignment for 2013 was Flavors by Four.  This is a mother/daughter blog with the mom and three of her four daughters sharing posting duties. I think this is a great idea.  Wish my daughters were interested in blogging.  The blog was started blog in 2010, and they are co-hosts of Wonderful Wednesday Blog Hop.

When visiting Flavors by Four, I thought I had “died and gone to heaven.”  Now they do have some main dish and savory recipes, but the sweets, oh the sweets.  If you are a  “sweetsaholic”  like me you must visit this block.  Just go and check out all the goodies listed on their right side bar. They include great process photos in their posts.


Partly because of the season, I chose to make Cranberry Crunch Cake.  I had a package of fresh cranberries that I had purchased on sale recently.  This was a very easy recipe to make because I could let my electric mixer do most of the work.  You do make candied nuts for the topping which needs to cook for 15 minutes and watched carefully to make sure they don't burn.  I used a generous cup of roughly chopped unblanched  almonds, filberts, pecans and walnuts.  The recipe called for 2 12 cups of fresh cranberries, but I just used the whole 12 oz. bag since I did not want to have cranberries left over.

This was a unusual cake, and we liked it very much.  I will be making it again.


Cranberry Crunch Cake
Flavors by Four
3 eggs
2 c. sugar
3/4 c. butter or margarine (I used 1/2 c. butter and 1/4 c. margarine)
1 t vanilla
1 t. almond extract
2 c. all-purpose flour
1 (12 oz.) bag fresh cranberries
1/4 c butter or margarine
1/4 c. brown sugar
1 c. coarsely chopped assorted nuts

Combine eggs and sugar in the bowl of a stand mixer and mix on medium speed for 7 to 8 minutes.  The egg and sugar mixture should double in size, leaving ribbons on top of the batter.  While the batter is beating, melt 1/4 c. butter in a small saucepan.  Add brown sugar and heat till it is melted.  Add nuts and cook over low heat until they are shiny and smell toasted, about 15 minutes.  Watch closely and stir frequently.  Meanwhile, add butter and flavorings, beating for another 2 minutes or until batter is smooth.  Add flour, a cup at a time, beating well after each addition.  Gently fold in cranberries.  Mixture will be somewhat stiff.  Spread batter in a well-greased 9x13-inch baking pan.  Using a spatula, gently add nuts to the top of the cake, covering the entire surface.  Bake at 350 degrees for 45 minutes.  Place pan on wire rack to cool  Allow to cool completely.  Cut into squares and serve with a dollop of whipped cream or topping if desired.  Makes 15 servings.


Group B will be "On Vacation" in January so my next Secret Recipe Club posting will be in February.  If you would like to join in the fun, you can go here to fill out an applications form.


reade more... Résuméabuiyad

Chocolate Cherry Surprise Cookies-Christmas Cookie Recipe Swap


Again this year I am participating in the Christmas Cookie Recipe Swap hosted by the three great bloggers listed above.  In this swap you are matched with another person, then you exchange a cookie recipe, make cookies from the recipe and blog about it on a certain day.  Well, today is that day.

I was matched with Leena from Pink Cherub Moon.  I was very excited when I received her recipe.  Ever since I was a child, my favorite Christmas-time candy has been chocolate covered cherries.  I would wait patiently until the candy became available; and after I got them, I would ration them by eating only one a day so that they would last longer.  Well Leena's recipe was for chocolate covered cherries in cookie form.  I could not wait to try them.

The cookies were very easy to make, although a bit more work than most cookies.  I did get only 39 cookies when I made them and not the 42-48 that the recipe said.  I may have rolled the balls a bit bigger than I needed to.

I would recommend not adding any additional cherry liquid to the frosting.  When I used the 4 t. of cherry liquid as listed in the recipe, the frosting was a bit harder to spread but the cookies came out like this.


When I added 2 additional t. cherry liquid the cookies came out like this.


I make homemade sweetened condensed milk and freeze it in 1/2 c. amounts to use in recipes such as this.  That way I do not need to try to figure out what I am going to do with the rest of a can of milk.  Instead of heating the chocolate pieces and milk together on the stove top, I put them in a 2-cup glass measuring cup and heated it in the microwave.  I heated the ingredients for 1 minute at 70 percent power, stirring it very well.  I then heated it in 10 second intervals, stirring each time.

Hubby loved these, and said he would like the cookies even without the cherries in them.  I plan to include these in my Christmas cookie trays.  Thanks, Leena, for a great recipe.

I am reprinting the recipe as I received it from Leena.


Chocolate Cherry Surprise Cookies
Makes 42-48 cookies.  Oven 350 degrees

Ingredients

1 (10 ounce) jar Maraschino Cherries
1/2 Cup butter or margarine
1 Cup sugar
1/4 teaspoon baking powder
1/4 teaspoon baking soda
1 egg
1 1/2 teaspoon vanilla
1/2 Cup unsweetened cocoa powder
1 1/2 Cups all-purpose flour
1 (6 ounce) package semisweet chocolate pieces
1/2 Cup sweetened condensed milk or low-fat sweetened condensed milk

Directions

Drain cherries, reserving juice.  Halve any large cherries.  In a medium mixing bowl, beat butter with an electric mixer on medium to high speed for 30 seconds.  Add the sugar, baking soda, baking powder and 1/4 teaspoon salt.  Beat until combined, scrapping sides of bowl.  Beat in egg and vanilla until combined.  Beat in cocoa powder and as much of the flour as you can.  Stir in remaining flour using a wooden spoon.  Shape dough into 1-inch balls.  Place balls about 2 inches apart on an ungreased cookie sheet.  Press you thumb into the center of each ball.  Place a cherry in each center.  For frosting, in a small saucepan combine chocolate pieces and sweetened condensed milk.  Cook and stir over low heat until chocolate is melted.  Stir in 4 teaspoons of reserved cherry juice.  Spoon 1 teaspoon frosting over each cherry, spreading to cover (frosting may be thinned down with more juice if needed).  Bake in a 350 degree oven for 10 minutes or until edges are firm.  Cool 1 minute on cookie sheet before transferring to wire cooling racks and let cool.  Note:  do not use imitation chocolate pieces.

reade more... Résuméabuiyad

Hershey Bar Personalized Santa Letter

Give your child a personalized Santa letter wrapped around an extra large 7 ounce Hershey candy bar.  You can add personalization and print at home for a quick gift!
Make a Personalized Santa Letter for your child on a Candy Bar
So Christmas is only a few days away!  Are you ready?  I am TOTALLY not.  I don't know why it seems that the holiday sneaks up on me every year.  It's not like it changes dates or I don't know that its coming.  It just seems that life happens and before you know it Christmas is here.

In case you're like me and are looking for a few last minute gift ideas to make the holiday a little extra special, I have been playing with a personalized Santa letter for Mini Me and I'm sharing it with you today!  You can add your child's personalized information to the letter and leave it in his or her stocking so it looks as if Santa brought a candy bar with a sweet letter just for them.  Or you can drop it in the mail today and have it delivered to your house to suprise your little one.


how to DIY a personalized Santa Claus letter

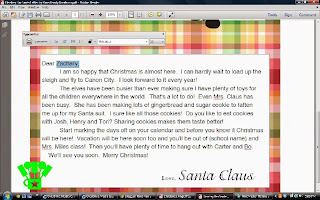
To make this letter for your child, go here and download the Personalized Santa Claus Letter in pdf format. Open the letter in Adobe Acrobat and find the personalization fields.  There are places to add your child's name, hometown, siblings' names, school, teacher's name, and friends' names.  Just click on the text area and add your information.

Personalized Santa Letter Printable
Print the letter out.  I like to use a thin photo paper (Kodak Glossy Photo Paper is my favorite) because it's nice and glossy, but you can use regular paper too.  I'm not a fan of cardstock because it can be hard to fold around the candy bar.

Candy Bar Personalized Santa Letter
Once you're done, cut off the white edges and glue around a 7 ounce Hershey candy bar. (I think it will fit any extra large candy bar, but I'm not 100% sure, so let me know if you try.)

Personalized Christmas Santa Letter
Now slip the candy bar into your child's stocking or into the mail to be delivered to your house!

If you have more than one child and don't want them to have the same letter, I have other candy bar letters available in my shop.  You can find another Santa Claus letter, a Letter from a Christmas Angel (religious theme), and a letter from your Elf on the Shelf!

Do you have any last minute gift ideas?
reade more... Résuméabuiyad

Pink Peppermint Parfait Bars-12 Weeks of Christmas Cookies

12 Weeks of Christmas Treats Blog Hop | Hosted by MealPlanningMagic.com

We have finally arrived at the last week of 12 Week's of Christmas Treats hosted by Brenda from Menu Planning Magic.  Unfortunately I missed last week due to being down with a respiratory infection.  I wasn't cooking or baking at all last week.

The bar cookie I am sharing this week is another versatile one, as the filling can be varied by using different flavorings and food colorings.  Besides peppermint, some good fillings are mint with green food coloring, cherry with pink food coloring, orange with orange food coloring, lemon with yellow food coloring and almond with no food coloring.

These are very pretty on any cookie plate.


Pink Peppermint Parfait Bars
1 sq. unsweetened chocolate, melted
1/2 c. butter or margarine, softened
1 c. sugar
1 c. flour
1 envelope unflavored gelatin
1/4 c. hot water
4 c. powdered sugar
1/2 c butter or margarine, softened
1/2 c. shortening
1/2 to 1 t. flavoring extract
2 to 3 drops food coloring
1 c. semi-sweet chocolate chips
3 T. butter or margarine, softened

Combine butter and melted chocolate and mix well.  Stir in sugar until well blended.  Stir in flour to make a stiff dough.  Press dough into a foil-lined 10x15-inch jelly roll pan.  Bake at 350 degrees for 10 minutes.  Remove from oven and let cool.  Soften gelatin in hot water, mixing well.  In large mixing bowl, combine gelatin, 2 c. of the powdered sugar, margarine, shortening, flavoring and food coloring.  Beat 1 minute at medium speed or until smooth and creamy  Blend in remaining 2 c. powdered sugar, beating until smooth.  Spread evenly over cooled crust.  Chill.  Place the chocolate chips and margarine or butter in a 2 cup glass measuring cup.  Microwave at 70 per cent power for 1 minute.  Stir well.  Microwave in additional 10 second increments at 70 per cent power, stirring between heatings if necessary.  Spread evenly over filling.  Chill till set.  Cut into bars.  Makes about 36.  Although it is not mandatory, these are best kept in the refrigerator.


Check out the links below to see what other bloggers have made this week.


Powered by Linky Tools
Click here to enter your link and view this Linky Tools list...
reade more... Résuméabuiyad

Tek Recon Gift Idea and Review

Tek Recon Gift Idea & Review

I have three boys in my home who are ALL BOY when it comes to toys and games.  Our house is filled with wrestling, crude jokes, lots of laughter, sports equipment, and play guns.  So when I got the chance to review the new Tek Recon Advanced Battle system, we were all very excited!


We were fortunate enough to recieve three guns, which worked out perfect for my three boys.  No one was left out during play.  We recieved the 

Tek Recon™ Havok

The Tek Recon™ High-Performance Blaster features 72 round capacity with quick-flip cartridge, retractable shoulder stock and smartphone mount for live action online gaming. Includes 36 NRG Rounds.
and the 

Tek Recon™ Hammer Head Battle Pack

The Tek Recon™ Hammer Head Battle Pack includes 2 Hammer Head Blasters, each with 25 round capacity, 2 exploding targets, 2 smartphone mounts, 30 NRG Rounds and 1 scannable flag for capture the flag game play.

As soon as we opened up the package, the boys were anxious to get started.  Just like other "boys" in my house (ahem, no names there Dear Hubby), there was no waiting or asking for directions.  It was nice that the guns were so easy to load and figure out so they could get started immediately.  Our Blaster gun was a little rough to actually fire at first and would only shoot every fourth or fifth pull of the trigger.  I'm not sure if it was the gun or the long trigger.  The boys just kept firing though and didn't complain too much about it.
We did find out rather quickly that it was easier to keep the play in one area of the house, since the "bullets" went everywhere and had to be searched out as soon as the boys needed to reload.  I found these little rubber "0"s everywhere over the next week.  They were under the couch, down the stairs, even in my shower. (Still not sure how that one happened.)  I'm not sure how you'd play with these outside unless you had a never ending supply, or maybe painted them with glow in the dark paint.
It took the boys a little longer to download and play with the Tek Recon app, but once they did, they were super excited and we found them hiding behind corners and couches all the time.  The gun play got a little wilder and the excitement kicked up a few notches.  They loved the heat sensor part of the app and ran around trying to find each other in the dark.  There is talk of going down to the local park and playing Capture the flag with a group in the wooded area, so I guess the app made the guns go above and beyond the other play guns we have in the house.
reade more... Résuméabuiyad

Chocolate Malt and Cherry Cookies-The Great Food Blogger Cookie Swap-2013

The Great Food Blogger Cookie Swap

Recently I participated in the third  annual Great Food Blogger Cookie Swap.  This is hosted by Lindsay from Love and Olive Oil and Julie from The Little Kitchen.   Last year and this year the swap has been sponsored by Oxo, and the participants have been asked to donate $4 which goes to Cookies for Kids Cancer.  This year $13,778.40 was raised.  Additional sponsors this year are Dixie Crystals and Grandma's Molasses.

Participants received some very nice gifts from the sponsors.  Oxo sent these great spatulas which will see a great deal of use in my kitchen.


Dixie Crystals sent a Bake-It-Forward Tin.  The idea here is to fill the tin with some baked goodies and pass them on to someone who could use a lift and ask them to pass it on to someone else.  I think this is a great idea.

  
I received wonderful, spicy Gingerbread Eggnog Puddles from Nena at Eat-Bake-Blog.  My hubby is a spice cookie fan, and he really loved these.  Des from Life's Ambrosia sent chocolate chip cookies that hubby and grandson really enjoyed on a recent 4-wheeling day. Ali sent peppermint cookies that were so suitable for this time of year.  I have managed to misplace the recipe so don't remember the name of her blog. I am sorry, Ali.  If you read this, let me know the name in the comments.  Edited 12/14/13  I found Ali's blog.  It is Ali Damron, who would have guessed?  I don't know where my mind was as I didn't think to take photos of the cookies I received this year.

I sent cookies to Eleana from Chou Down, Christina from The Dough Will Rise Again, and Kara from Kara in the Kitchen.  

For this year's cookie, I decided to adapt a favorite cookie recipe from my childhood so I added some chocolate malted milk powder and chopped, candied cherries to make it festive. My mother baked these often when I was a child.  I believe that the recipe originally came from Betty Crocker.  Because I was shipping the cookies, I omitted the frosting.  I highly recommend frosting the cookie if you are making them at home.


Chocolate Malt and Cherry Cookies
11/3 c butter or margarine, softened
2 c. sugar
2 eggs at room temperature
2/3 c. buttermilk
2 t. vanilla
3 1/2 c. flour
1 t. baking soda
1 t. salt
1/4 c. cocoa powder
1/2 c. chocolate malted milk powder
1 c. finely chopped candied cherries
1 c chopped, toasted walnuts

In a large mixing bowl beat butter or margarine and sugar until light and fluffy.  Add eggs, buttermilk and vanilla.  In a medium mixing bowl, combine flour, baking soda, salt, cocoa powder and malted milk powder.  Add to wet ingredients and mix until well blended. Stir in candied cherries and walnuts.  Cover and chill at least 1 hour.  Drop by rounded teaspoonsful about 2 inches apart on a parchment-lined baking sheet.  Bake at 400 degrees 8 to 10 minutes. The dough needs to be kept very cold or the cookie have a tendency to flatten out when they are baked  If this begins to occur, return the dough to the refrigerator to chill again.  Frost if desired.  Makes about  7 dozen cookies.

Chocolate Malt Frosting
1/2 c. butter, softened
2/3 c. chocolate malted milk powder
1/4 c. cocoa
4 c. powdered sugar, sifted
1 t. vanilla
pinch salt
2-6 T. milk or light cream

In medium mixing bowl, beat with malted milk powder until creamy.  Add cocoa, powdered sugar, vanilla, salt and 2 T. milk or cream. Beat well. Add more milk or powdered sugar as necessary to get desired spreading consistency.

  
If you missed this year's swap, but think that you would like to take part next year, you may sign up to get notifications regarding next year's swap by going to this page.

Stop by either of the hosts blogs on Monday to see all the great cookies that were exchanged in the swap.  


reade more... Résuméabuiyad