Pages

Crayon Cake Push Pop Printable

I am a huge fan of the Push Pop cake craze.  I love everything about cake balls, but I don't have the decorating skill to be able to make cute cake balls to wow my party guests.  So the ease of putting together and decorating the cake push pops, really appeals to me.

So when I began to think about cupcakes for my Back to School party, I thought about the push pops that I had sitting in my closet.  Since I'm going with a school supply theme, I was inspired by Bakerella's Pencil Push Pop Cakes.  But I would rather be able to place the lid on the push pop and I just don't have the patience to go to all the work of dyeing all those different cake layers different colors.


So my laziness and love of a quick project led me to design these Crayon cake push pop printables.

I started by making a Funfetti cake and then using the push pops to fit circles of cake inside.  I found the easiest way to do this was to push the open end of the pop down into the cake and then push it down to the bottom with my finger.  Then, add a bit of frosting to the top and repeat.  I did this so there were 3 layers of cake/frosting, cake/frosting, and cake/frosting.  The top layers of frosting I then dipped into red, yellow, or blue sprinkles.

After putting the lid on the cake push pop, I printed out my crayon printable onto cardstock and cut them out.  It was then easy to wrap the printable around the base of the push pop making it look like a crayon.

Simple, easy, and quick.  My favorite type of project.

Here's the printable in case you want to try these for your Back to School party too!  And if you need some push pops to create them, you can purchase them HERE.
reade more... Résuméabuiyad
Back to School Shopping for Colorful Party Supplies

back to school shopping
I know that many schools throughout the country have already gone back to the classroom, cutting summer way to short.  We still have one last Hoorah before we go back next month.  

But to get my kids ready for the dreaded first day of school, I've already started talking about clothes shopping and buying those back to school supplies.  They groan and yell at me every time I bring it up, but you have to keep plugging on.  Maybe if I showed them all these fun Back to school party supplies, they'd be as excited as I am about the big day...okay maybe not, but one can try, right?


Crayon Shaped Savings Bank
How cool would these Crayon banks be to fill with candy and then send home with the kids as a party favor? A great idea to help the kids save for next summer's vacation or Christmas break. 
School Bus Photo Booth
With photo booths all the rage right now, this School Bus stand in would be a great way to get that "first day of school" look without chasing down the bus...which I hear is a big no-no.  (Not that I know from first hand experience.)

Buffet Caddy
3. Buffet Caddy
I just love how this buffet caddy keeps all your party essentials in a compact, organized space.  This caddy won't take up a lot of space on your buffet table but will make your silverware and napkins easy for all your guests to grab.

Toy Filled Plastic Apples
These apples are designed to be filled with toys and treats to put a new spin on the old bobbing for apples game, but could easily be filled with erasers, bookmarks, and other school supplies as a party favor for your back to school party.
Tissue Apple Garland
If you are going for a traditional Back to School party theme with apples, this apple garland would make a great backdrop behind your dessert table or hanging through the party room.  The bright red color is eye catching and the 6 foot length is long enough to stretch across your photo booth backdrop or dessert table.

Personalized School Days Banner
Welcome your guests to your back to school party with a personalized banner hanging outside your door or house.  The school supply theme is great for the party I'm planning and would fit perfectly with a Welcome Back design.

School Days Pencil Drawing Fabric
With only a few yards of this fun School days fabric you would have a unique and fun table cloth for your Back to School dessert table.  The different color letters and numbers with the long lines of color from the pencils make this fabric colorful but not too distracting.  This lets your treats do the talking and the fabric be the exclamation point!

Silicone Alphabet Letter Ice / Bake Tray Set

These alphabet letters would be a great way to make your drinks cold while still keeping with the Back to school theme.  How fun would it be to make them in red, yellow, or blue koolaid and then place them inside 7up?  The colors would really pop and the kids could practice there ABCs in fun, yummy style.

Jelly Belly Candy Crayons
These candy crayons are such fun.  You can have the kids play with them by doing coloring books or work books and then they can reward their hard work by eating the yummy treats inside.  My kids have enjoyed these before and they are certainly a fun way to have to do your homework.

M and M Upcycled Notebook
If you have to go back to school, why not do it in sweet style?  This candy notebook would even make writing your homework notes a fun task since it's made from a real M&M candy box.  You can almost smell the chocolate.

Do you plan to have a Back to School party this year?  What are you doing to make it more memorable and fun?
reade more... Résuméabuiyad

Italian Parmesan Zucchini Patties

I adapted this dish, Italian Parmesan Zucchini Patties, from a hand-written recipe in the back of my mother's Zucchini Cookbook that I mentioned in my Spiced Chocolate Zucchini Bars post.  They are quick and easy to make with a heartiness that would make them good for a meatless meal.  I used yellow zucchini and didn't think you could even taste it, so you may be able to get these by the non-zucchini eater.

This recipe makes about eight 3-inch patties so makes about 4 servings.  Increase the ingredients if you need to make more..  Use purchased or homemade biscuit mix, and it is OK to use the shelf-stable type of grated Parmesan in these.  Because of the generous amount of Parmesan, I did not add any salt to the recipe.

These are best when made with fresh shredded zucchini.  If you use thawed, frozen zucchini, be sure to drain it well.


Italian Parmesan Zucchini Patties
1/3 c. biscuit mix (You can make your own)
1/4 c. grated Parmesan cheese
3/4 t. Italian seasoning
2 eggs, slightly beaten
1/8 t. black pepper, coarsely ground if possible
2 c. shredded zucchini
2 T. butter, margarine or vegetable oil

Combine biscuit mix, cheese, Italian seasoning and pepper in a medium mixing bowl until well blended.  Stir in egg until dry ingredients are well moistened.  Fold in grated zucchini.   Heat  chosen fat in a 10-inch skillet.  When fat is hot, drop 3 or 4 heaping tablespoonsful of batter into hot skillet.  Flatten with the back of a spoon to about 3-inch rounds.  Cook 2 to 3 minutes or until bubbles cover the surface of the patties, flip and continue to cook 1 to 2 minutes until done and golden brown.   Makes about 8 patties.


Linking to these great parties:
Show Me What Ya Got    
Take-A-Look Tuesday
Two Cup Tuesday
Tasty Tuesday
Cast Party Wednesday
Show and Share Wednesday
Wow Me Wednesday
What's Cookin' Wednesday
Lil Luna Link Party
Whimsy Wednesday
What's in Your Kitchen
Wicked Good Wednesday
Create and Share
Whole Foods Wednesday

reade more... Résuméabuiyad

Fried Onion Shreds

 Good Monday and welcome to my new followers.  I have been somewhat remiss in the last couple of weeks, but want to thank all who take the time from their busy lives to read this blog.  It is truly appreciated.

I may have mentioned in the past that we have a commercial deep-fryer in my husband’s shop, and he does all the deep frying at our house, much like some men grill.
 
Fried Onion Shreds are a little side dish that we usually make whenever hubby is deep frying something else.  They are quick and easy and take very little time to cook.  I prefer these; because, unlike onion rings, the onion shreds themselves get crisp and golden.   The shreds are good with almost any main dish.

Although these can be dusted with just flour, I like to use a combination of flour and cornmeal.  The seasonings can be seasoned salt or any other seasoning of choice.


Fried Onion Rings
1/3 c. flour
1/3 c. cornmeal
1 1/2 t. seasoned salt
1 very large onion
oil for deep frying

Put flour, cornmeal and seasoned salt into a large plastic bowl that has a lid.  Cut onion in half and slice thinly.  Put onion slices in bowl and place the lid on bowl.  Shake well to coat onions.  If you don’t have a bowl with lid, this can be done in a large zip-top bag.  Remove onions a few at a time to a sieve and shake sieve over the bowl to remove excess coating.  Place onions in a bowl.  Repeat until all the onions have been shaken in the sieve.  Fry in hot oil until golden brown.  This will take only a couple of minutes.  Remove onions and drain on paper towels.  Makes 4 servings.


Linking to these great parties:
Made by You Monday
Mix It Up Monday
Monday Funday
Recipe Sharing Monday
Melt In Your Mouth Monday
Marvelous Monday
Inspiration Monday
Busy Monday
Manic Monday
Make the Scene Monday
reade more... Résuméabuiyad

Online Blogcon Early Bird Special Ends Friday


Well, I said that I don't usually post on Sunday, and here I am today with post number 2.  I just want to be sure that any of my lovely readers who might have been thinking about "attending" Online Blogcon this fall and may have put registering on the back burner or forgotten about it, that Early Bird Pricing ends next Friday, August 2nd.

So, why would you want to "attend" this conference?  Well, for one, you can go in your pajamas with no make-up.  More serious, you will get very useful information to help you grow your blog without investing a lot of money and having to be away from home for several days.  This year the conference is divided into 3 sections.  There is a section for the beginner blogger, a section for a more experienced blogger, and a section specifically for the food or craft blogger.  Each section is $19.99 or all three can be taken for $49.99.  This is the Early Bird Price that will expire on Friday.  The pricing will go up after that.

Personally, besides the great information available, I think that the best thing about Online Blogcon is the private Facebook membership that comes as part of the package.  You get to become part of the Online Blogcon community, and that happens as soon as you complete your registration.  You don't have to wait until October to ask questions and get answers, share your triumphs, get networking opportunities and so much more.  If you do not have family and/or friends involved in blogging, you know that it is sometimes a lonely path.  You will find people here who understand you and share your passion.  To get all the facts and to register, please visit onlineblogcon.com

Note:  I attended Online Blogcon last year and am attending all three session again this year, but I am not an affiliate nor am I being compensated for this post.  I just think that this is a wonderful option to spending time and money to attend a "regular-type" conference.  Hope I "see" you there.
reade more... Résuméabuiyad

Pink Pomegranate Bars-Guest Post at The Foodette


I don't usually post on Sundays, but I wanted to share that today I have the privilege of guest posting over at The Foodette.  I am sharing a quick and easy bar cookie recipe that is made with pomegranate juice.  Thanks, Susan, for having me.   The recipe is here if you would like to check it out.  See you all tomorrow.

reade more... Résuméabuiyad

Spiced Chocolate Zucchini Bars-Saturday Sweet

I may have mentioned in an earlier post, that last fall one of my daughters and her family moved from 50 miles away to just 5 or 6 miles down the highway from us.  She put in a garden and is sharing her bounty with us.  She planted zucchini so you all know what that means.  I am sure that there will be a number of zucchini recipes here on the blog in the next few weeks.

I thought that I would start off with a recipe for a sweet, Spiced Chocolate Zucchini Bars.  Unlike most recipes, this one calls for chopped and not shredded zucchini.  If you want it totally hidden, it can be peeled.  I never bother with peeling it myself.  Although I use buttermilk, this is one instance where the 1/2 t. lemon juice or vinegar to 1/2 c. milk works fine.  I top the bars with a simple chocolate glaze.

This an adaptation of a recipe from The Zucchini Cookbook by Paula Simmons, 1974.  This is a cookbook that belonged to my mother.


Spiced Chocolate Zucchini Bars
adapted from The Zucchini Cookbook by Paula Simmons, 1974
1/2 c. butter softened
1/2 c. vegetable oil
1 3/4 c. sugar
2 eggs at room temperature
1 t. vanilla
1/2 c. buttermilk
2 1/2 c. unsifted flour
1/4 c. cocoa
1/2 t. baking powder
1 t. baking soda
1/2 t. cinnamon
1/2 t. cloves
1/2 t. salt
2 c. finely diced zucchini
1/4 c. butter, melted
1 c. sifted confectioner’s sugar
1 T. cocoa
1 t. vanilla
1-2 T. hot water

Cream butter, vegetable oil and sugar in a large mixing bowl until well blended.  Beat in egg, vanilla and buttermilk.  In a small bowl combine flour, cocoa, baking powder, baking soda, cinnamon, cloves and salt.  Add to sugar mixture and stir until well blended.  Stir in diced zucchini.  Spoon batter into a greased and floured 9x13-inch baking pan.  Bake at 325 degrees for 40 to 45 minutes.  Remove from oven and place pan on a wire rack to cool.  When cool, combine butter, confectioner’s sugar, cocoa and vanilla until well blended.  Stir in enough hot water to make a glaze consistency.  Spread evenly over the top of cooled bars.  Let glaze set up, then cut into bars.  Makes about 36 bars.


 Do you have a favorite sweet recipe that uses zucchini as an ingredient?

Linking up to these great parties:
Weekend Potluck
Share Your Creativity
Weekend Bloggy Reading
Saturday Spotlight
Strut Your Stuff
I'm Lovin' It
Sugar and Slice Sunday 
What'd You Do This Weekend


reade more... Résuméabuiyad

Friday Finds


My Friday Finds this week are kind of all over the map as I am sharing a little of everything,  It has been so hot here, that It has been very difficult to even think about cooking.

Home Cooking Memories

I am always looking for new barbecue sauce recipes to try.  This has the unusual ingredient of peach tea and sounds very interesting.  I got a buy on country ribs recently and have several packages in the freezer.

Six Sisters Stuff

If I must cook in this heat, than the slow cooker seems to be the thing I should use.  I love chicken wings, hubby not so much, but Camille says drumsticks or breasts can be used.  I'll bet thighs will work, too.

Yummy, Healthy and Easy

Peaches are finally getting into full swing here.  I love summer fruits.  With more than one slow cooker, I could make this in one while the chicken wings are cooking in another.  No heat in the kitchen, Yeah!

Cent Less Deals

Not sure that it is even legal to have all the ingredients that are in this, together in one dish, and it is no-bake.  What more could I want when it is hot.

4 Little Fergusons

Well, after that last recipe, I better end today's finds with something a little healthier.  This is a recipe I ran across several weeks ago and have had it on the back burner to make.  That is finally happening today.  I love the potato stick idea.

There is some of my finds for this week.  I am linking up to Friday Favorite Finds over at Finding Joy in My Kitchen.  Click on over to see what other bloggers have found to share this week.


reade more... Résuméabuiyad

Double Peanut Crunch

I have a confession to make.  I really love Peanut Butter Captain Crunch Cereal.  It is just about the only cold cereal that I purchase to eat as cereal.  Other cereals I purchase, I usually use in recipes.  Now I know that Peanut Butter Captain Crunch is really just breakfast candy.  So if it is really breakfast candy, might as well make something candy-like with it.  Right?

Double Peanut Crunch is just Peanut Butter Captain Crunch Cereal and peanuts with a candy coating.  If you are not the fan of this cereal that I am, any other round or doughnut-shaped cereal may be used instead.  Change the nuts or not as you wish.

A word of warning.  Don’t make this unless there are other people around to help eat it.  If you do, you may find that it is gone and that it was you who ate it.


Double Peanut Crunch
1/2 c. butter
2/3 c. brown sugar
1 T. corn syrup
1 c. salted peanuts
2 c. Peanut Butter Captain Crunch Cereal

Melt butter in a 3-qt. non-stick saucepan.  Add brown sugar and corn syrup.  Heat and stir over medium heat until mixture reaches a full-rolling boil.  Boil and stir 1 minutes.  Quickly stir in peanuts and cereal and mix well.  Turn out onto a waxed paper-lined baking sheet and smooth into a single layer.  Let cool.  Break up if necessary.  When cool, store in an air-tight container or zip-top bag.  Makes about 3 cups.


Linking to these great parties:
Full Plate Thursday
Catch a Glimpse Party
Thursday's Treasures
Showcase Your Talent Thursday
Tasty Thursday
Fantastic Thursday

reade more... Résuméabuiyad

Summer Fun Watermelon Placemat Printable


I've had the idea for a Printable Dry Erase place mat for quite a while now but haven't really had the excuse to make one.  None of the parties I've done lately have had a sit down dinner and while our BBQ really isn't a sit down type of activity, I thought this dry erase place mat would be perfect to help keep the kids busy while we finished up the hamburgers and hot dogs for dinner.


And the great thing is it's a SUPER quick and easy project.


Simply save and print out the graphic above by right clicking on it and hit "save".  Then go to wherever you saved it and double click on the picture.  It should bring it up in a separate window.  Click the "Print" button at the top and select your printer.  Be sure to change the paper size to "legal" and hit print.

Now you can either let the kids play with the place mats and some crayons, or you can laminate the place mat to make it dry erasable and reusable.

Either way it's a quick and easy way to keep the kids busy while you finish dinner.  
  I can't wait to try them out this week at Mini Me's birthday!  And soon, hopefully, I'll have a few more of these available for different themes.  Do you think you would use them?
reade more... Résuméabuiyad

Cumin Corn Salad

This is one of the salads that I made to take with us on our vacation.  I am a big fan of the smoky sweet flavor of cumin so wanted to play it up here.

This is similar to the corn and corn chip salad that has been around.  I just put ingredients that I like together.  I prefer to eat this with crushed corn chips added, but I do not like to add them to the entire salad in case there is some leftover.  The corn chips become soft when the salad is stored in the fridge. I serve the corn chips on the side, and let each person add as many or as few as they like.

The salad will keep two or three days well chilled in the fridge.


Cumin Corn Salad
2 (16 oz.) cans whole kernel corn, well drained or 4 cups fresh or frozen corn, cooked and drained
1/2 c. red onion, chopped
1 rib celery, chopped
1/3 c. red pepper, chopped
1/4 c. black olives, chopped
1/4 c. mayonnaise
1/4 c. picante sauce
1 1/2 t. ground cumin
1 t. garlic pepper
corn chips

Place well-drained corn in a medium mixing bowl.  Add onion, celery, red pepper, black olives and mix well.  In a small bowl combine mayonnaise, picante sauce, cumin and garlic pepper.  Stir mayonnaise mixture into corn mixture until vegetables are thoroughly coated with dressing.  Chill at least a few hours to allow flavors to blend.  Serve with corn chips to crush over the top.  Makes 4 servings.


Linking to these great parties:
Cast Party Wednesday
Show and Share Wednesday
Wow Me Wednesday
Two Girls and a Party
What's Cookin' Wednesday
Lil' Luna Link Party
Whimsy Wednesday
What's in Your Kitchen
Wicked Good Wednesday
Create and Share


reade more... Résuméabuiyad

Teriyaki Mini Meat Loaves

A number of years ago, Safeway sold a dry teriyaki mix to use to make teriyaki hamburgers.  The package had a recipe for a teriyaki meat loaf on the back, and it was a meat loaf that we loved.  Unfortunately, the product is long gone so I had to make a few adjustments to continue to make the recipe.

The original recipe mixed the dry mix with 1/4 c. of water.  I now use 2 T. liquid teriyaki sauce and 2 T. water or milk as there is additional milk in the recipe.  This give a mild teriyaki flavor to the meat loaf.  For a more pronounced teriyaki flavor, the teriyaki sauce can be increased and the water or milk decreased.

I often make this as a large, regular meat loaf but make mini meat loaves when I am pressed for time.  We like it both ways.  The large meat loaf may be cooked in a loaf pan if desired.  I just prefer my meat loaves to be free-form so I don’t use a loaf pan.


Teriyaki Meat Loaf
1 1/2 lbs. lean ground beef
1 medium onion, finely chopped
2 cloves garlic, minced
1/2 c. fine bread crumbs
1/2 t. oregano
1 t. salt
1/4 t. pepper
2 eggs, slightly beaten
2 T. teriyaki sauce
2 T. water or milk
1/2 c. milk
Kikkoman Teriyaki Baste and Glaze or catsup for glazing meat loaf (optional)

Place ground beef, onion, garlic, bread crumbs, oregano, salt and pepper in a medium mixing bowl and mix together lightly.  In a small bowl, combine egg, teriyaki sauce, water and milk.  Mix to blend well.  Add to ground beef mixture and mix lightly but thoroughly.  Form in a loaf shape or into 6 mini loaf shapes.  Place in a greased baking pan.  Bake at 350 degrees about 1 hour for the large meat loaf and about 45 minutes for the mini meat loaves.  Baste with Baste and Glaze or Catsup after meat loaf or loaves have cooked about 30 minutes.  Serve with additional Baste and Glaze or catsup if desired.  Serves 6.

Linking to these great parties:
Totally Tasty Tuesday
Show Me What You Got Tuesday
Tasteful Tuesday
Tuesday Talent Show
Show Me What Ya Got
Take-A-Look Tuesday
Two Cup Tuesday
reade more... Résuméabuiyad

10 Amazing Watermelon Carvings

10 Amazing Watermelon Carvings at Kims Kandy Kreations

I remember going to the candy show a few years ago and one of the booths had a Watermelon Carver there.  He was making the most interesting and beautiful flowers carved from watermelon.  I have to admit, I did stay at that booth a little longer than normal, but I have no idea what candy the booth was actually promoting.
Since then, I have been utterly in awe of some of the watermelon carvings that I have seen around the web.  With Mini Me's birthday just around the corner, I wish that I had the skills to try some of these amazing projects.

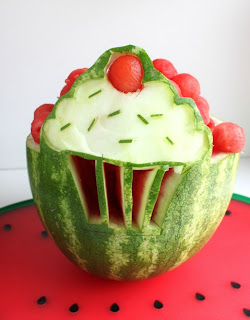
Cupcake Watermelon Carving by Created by Diane.
1. Cupcake Watermelon Carving by Created by Diane.
Drum Set Watermelon Carving by Food Stylin with David Leathers.
2. Drum Set Watermelon Carving by Food Stylin with David Leathers.
Sunset Watermelon Carving by Karvd.

Santa Claus Watermelon Carving from Vegetable Fruit Carving.com
4. Santa Claus Watermelon Carving from Vegetable Fruit Carving.com

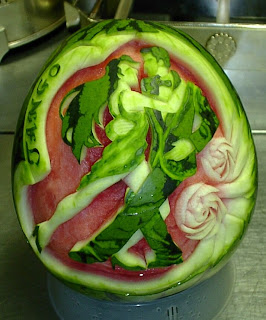
Tango Watermelon Carving from Watermelon Sculpture.com
5. Tango Watermelon Carving from Watermelon Sculpture.com

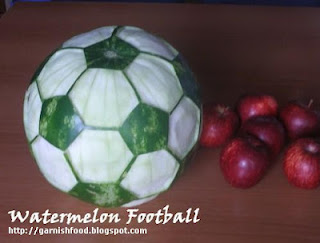
Soccer ball Watermelon Carving by Garnish Food.
6. Soccer ball Watermelon Carving by Garnish Food.

Dragon Watermelon Carving by The Invisible Underground
7. Dragon Watermelon Carving by The Invisible Underground.

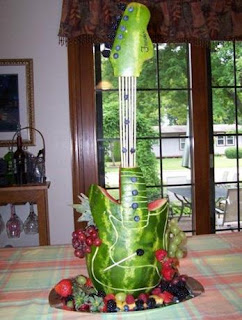
Guitar Watermelon Carving from What About Watermelon?
8. Guitar Watermelon Carving from What About Watermelon?

Indian Watermelon Carving by Greyloch on flickr.
9. Indian Watermelon Carving by Greyloch on flickr.

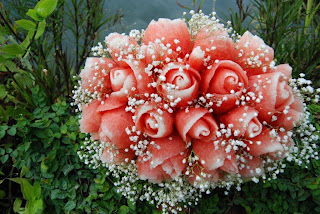
Bouquet of Roses Watermeon Carving from Love Round and Round.
10. Bouquet of Roses Watermeon Carving from Love Round and Round.

Okay, so seriously?  That dragon and those roses?  So. Awesome. 
Have you seen a watermelon carving that you have been impressed with?  While I'm dreaming, what do you think I should try for Mini Me's birthday?
reade more... Résuméabuiyad